Beginner’s Guide: Downloading PC Games on Windows 11, Step-by-Step
New to PC gaming on Windows 11? Here’s the clean, safe path: pick a trusted store (Steam, Epic, GOG, Microsoft Store, or itch.io), install its game launcher if needed, sign in, choose a sensible install location, and click Install. This guide shows each step, how to avoid storage headaches, and where to find free PC games and demos without risking malware. At Retro Gaming Blog, we add retro-friendly tips—DRM-free classics, indie gems, and family play—so your library grows smartly from day one.
What you need before you start
Do a quick preflight so downloads don’t stall later.
- Check the game’s store page for minimum and recommended system requirements, and confirm you have enough free disk space.
- Have your account logins ready: Microsoft/Xbox, Steam, Epic, GOG, itch.io.
- Update Windows 11, update GPU drivers (NVIDIA/AMD/Intel), and restart.
- Ensure you have DirectX 12 support—“the industry‑leading graphics platform for high‑performance Windows games” (see Microsoft’s overview of DirectX 12 for Windows games).
“System requirements” are the minimum and recommended hardware/software specs a PC needs to run a game. They typically list CPU, GPU, RAM, storage size, OS version, and supported APIs. Meeting only minimum specs may run the game at lower settings, while recommended targets smoother performance.
Tip: If you’re unsure about specs, compare your CPU, GPU, and RAM in Settings > System > About and Device Manager, or use your vendor’s app (GeForce Experience, AMD Software) to verify driver versions.
Choose a trusted place to get your game
Pick a reputable source. Each storefront has a distinct strength:
- Steam: the leading digital game distribution platform for PC with a massive catalog, robust updates, and community features (as cataloged in the curated awesome-windows list).
- Epic Games Store: a modern digital storefront for PC and Mac known for exclusive releases and weekly freebies.
- GOG: offers DRM‑free downloads with classic-friendly releases and enhanced re‑releases.
- Itch.io: a discovery-driven hub for indie experiments, jams, and retro‑inspired titles.
- Microsoft Store/Xbox app: browse, buy, and download Windows 11 games natively without a separate client (see this general how-to on installing PC games).
DRM‑free means you can download and keep the game installer without always needing an online check. It typically allows offline play, easy backups, and simple transfers between PCs. It doesn’t grant a license to share; it simply removes constant copy‑protection checks.
At Retro Gaming Blog, we lean toward DRM‑free options for long‑term preservation when available, but we use all of these storefronts.
A quick comparison:
| Best for | Key perk |
|---|---|
| Steam: mainstream catalog, mods, retro collections | Strong community features and deep sales |
| Epic Games: big-budget hits, casual new players | Regular free titles and periodic coupons |
| GOG: classics, preservation, collectors | DRM‑free installers and enhanced re‑releases |
| Microsoft Store/Xbox: Game Pass, system-level features | Native Windows 11 installs and cloud saves |
| Itch.io: indie/retro experiments, prototypes | Pay-what-you-want, vibrant creator scene |
Install the right launcher
Many stores require a game launcher (Steam, Epic, GOG). The Microsoft Store/Xbox app can install games natively on Windows 11.
Fast install options:
- Use winget, the official Windows Package Manager built into Windows 11, from Terminal/PowerShell; Retro Gaming Blog prefers it for clean installs, and Ninite also enables safe multi‑app installs for beginners (see Windows Central’s guide to first apps on a Windows 11 PC).
- Alternatives like Chocolatey and Scoop are popular package managers if you prefer their workflows.
Install via winget (examples):
- Steam: run
winget install --id Valve.Steam -e - Epic Games: run
winget install --id EpicGames.EpicGamesLauncher -e - GOG Galaxy: run
winget install --id GOG.Galaxy -e
Install via direct download:
- Visit the store’s official site, download the installer, run it, and follow prompts. Accept desktop/start menu shortcuts if you want quick access.
Sign in and find your game
- Microsoft Store/Xbox app:
- Open Microsoft Store, select Gaming.
- Choose your game and click Get/Buy.
- Sign in with your Microsoft account.
- Click Install to start the download (general flow mirrors this step-by-step guide to installing PC games).
- Steam:
- Install the Steam client and sign in.
- Find a game page, add to cart, purchase.
- Click Install to choose location and begin download.
Before purchase, scan the game page for file size, system requirements for PC games, and supported features. Also confirm region availability and languages to avoid post‑checkout surprises. Tip: Wishlist or follow developers—especially for indie/retro‑inspired projects—to track updates and deals.
Purchase or claim the game
- Free titles show Install/Get; paid games prompt for secure payment on official storefronts.
- Claim limited‑time free PC games and demos on Epic, Steam, and GOG to test performance, controls, and storage fit before buying full releases.
Your “account library” is the collection of game licenses tied to your store login. Once you purchase or claim a title, it appears in your library for re‑download on any PC where you sign in, subject to platform rules.
Retro Gaming Blog often highlights worthwhile demos and preservation‑friendly freebies when we cover new releases.
Pick an install location
Use a drive and folder strategy that stays tidy over time.
- Create D:\Games (or similar) on a larger SSD/HDD and install there. Avoid Program Files to reduce permission and modding friction and to keep Windows stable. This is our go‑to setup at Retro Gaming Blog.
- Installing games to a separate drive helps prevent your C: (Windows) SSD from filling and makes backups/reinstalls easier.
- Defaults: Program Files is the standard for 64‑bit apps; Program Files (x86) hosts 32‑bit apps. See Microsoft’s guidance on where to install PC games.
SSD vs HDD: Prefer SSD for faster load times; use HDD or an external SSD for bulk storage when space is tight.
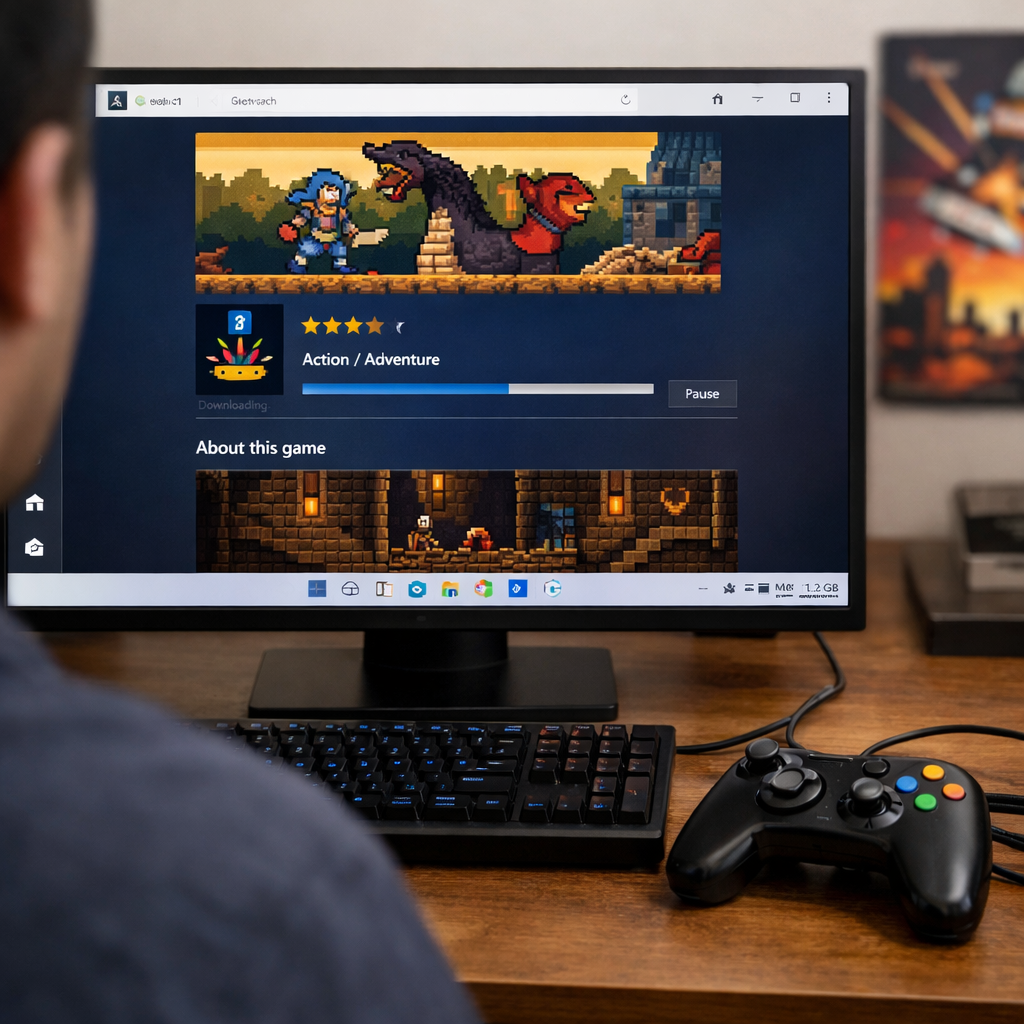
Download and install
Follow this repeatable flow across stores:
- Click Install/Get on the game page.
- Choose your install directory (e.g., D:\Games\Studio\Title).
- Confirm required space and available free disk space.
- Start download and watch progress.
- Wait for verification/patching to complete.
- Finish and create desktop/start menu shortcuts if you want one‑click play.
Keep your game launcher open during install; avoid shutting down while it says “verifying,” “finalizing,” or “patching.” If a download pauses, check your network, then resume in the client. See troubleshooting below for Store issues.
Launch, update, and manage your library
- Launch from the store client or any desktop shortcut you created.
- Auto‑updates are on by default; you can also manually select “Check for updates.”
- Organize: tag games by genre or “retro,” create collections, and hide completed titles to reduce clutter.
- Streaming options: Steam Link lets you stream your Steam library to other devices, and advanced tools like Parsec can enable high‑performance remote play up to 4K60 with low latency.
Optional library managers for multiple launchers
Playnite is an open‑source video game library manager that unifies collections from multiple platforms and can import Steam, GOG, Epic, and others (see the awesome-windows list entry).
- Setup flow: install Playnite, connect accounts, import libraries, customize themes and views.
- Heroic Games Launcher is another open‑source option focused on Epic, GOG, and Amazon titles on Windows.
Keywords to look for: library manager, unified launcher.
Safe downloading and storage tips
Retro Gaming Blog keeps this simple and safe: stick to official sources and built‑in protections.
- Only download from official storefronts or developers’ sites; avoid piracy to reduce malware risk.
- Keep Windows Security updated, enable SmartScreen, and run a reputable antivirus.
- When elevated commands are required, tools like gsudo help you run them safely.
- Storage hygiene: install large games on a secondary HDD/SSD or an external SSD if internal space is tight, and periodically clear temp/download caches in each launcher.
Retro context and where to find classic-friendly PC games
If you love the ’90s golden era, start with GOG for DRM‑free classics and enhanced re‑releases, and browse itch.io for retro‑inspired indie experiments. For family setups, look for controller‑friendly and low‑spec titles that run on modest GPUs and older panels. At Retro Gaming Blog, we often cover cheat codes, iconic accessories (think flight sticks and arcade pads), Japan’s distinct PC scene, and modern display tips like low input lag and HDMI 2.1—small tweaks that make sprite art and CRT‑era design sing on today’s monitors. RGB lighting and mild hardware modding can add fun flair, but prioritize cooling and cable management first.
Troubleshooting common download issues
Microsoft Store and Xbox app hiccups (queued, slow, won’t start) are common. Most are fixed by cache resets, app repairs, and quick network tweaks. Try this checklist in order, then dive into the relevant subsection.
- Confirm date/time/region are correct.
- Run a Store cache reset.
- Repair/Reset the Microsoft Store app.
- Flush DNS and reset the network stack.
- Try the Xbox app as an alternate installer.
- Adjust Delivery Optimization and proxy settings.
- Repair Gaming Services; update Windows 11 fully.
Microsoft Store downloads stuck on queued
- Verify date/time/region. Press Win+R, run
wsreset.exeand let the Store reload. - Repair/Reset: Settings > Apps > Installed apps > Microsoft Store > Advanced options > Repair (or Reset).
- Run admin network commands (PowerShell or CMD):
ipconfig /flushdnsipconfig /releaseipconfig /renewnetsh winsock resetnetsh int ip reset
- Try installing via the Xbox app (same Microsoft account). As a test, try a mobile hotspot to rule out ISP/CDN issues.
Slow download speeds
- Run
wsreset.exeand disable manual proxy: Settings > Network & Internet > Proxy. - Delivery Optimization: Settings > Windows Update > Advanced options > Delivery Optimization; set download bandwidth near 100% (temporarily).
- Run troubleshooters: Windows Store Apps and Network & Internet. If needed, repair Gaming Services from Settings > Apps.
- Pause other large downloads and disable any bandwidth caps in your launcher.
Game won’t install after purchase
- Confirm ownership on the correct Microsoft/Store account and region availability; restart the PC.
- Fully update Windows 11, then repair Gaming Services. If errors persist, reinstall Gaming Services and try again via the Xbox app.
- As a last resort, back up saves and use Windows recovery options (Reset this PC or in-place repair).
Frequently asked questions
How do I check if my PC can run a game on Windows 11?
Look at the game’s store page for minimum and recommended specs, then compare your CPU, GPU, RAM, and storage. If you’re unsure, Retro Gaming Blog’s quick checks can help you match parts to requirements.
Where should I install games to save space on my C drive?
Create a folder like D:\Games on a larger HDD/SSD and select it during install. This keeps your Windows SSD clear and mirrors the setup we use at Retro Gaming Blog.
Is it safe to use free game offers and demos?
Yes—when they’re from official storefronts or the developer’s site. In our guides, Retro Gaming Blog points to official sources to reduce malware risk.
Can I move an installed game to another drive without redownloading?
Most launchers let you move install folders or “manage install” to another drive. If a client doesn’t support it, back up, reinstall to the new location, and point the launcher to existing files.
Why does a launcher need to run to play my game?
Many stores use a launcher to verify licenses, manage updates, and provide overlays or cloud saves. DRM‑free releases (like many on GOG) often run without a launcher, but features may be limited.