There’s nothing more frustrating than diving into a classic game, pressing jump at the perfect moment, and nothing happens. Sticky buttons can turn a great gaming session into an irritating mess, especially when the fault lies not with your reflexes, but with an unresponsive controller. Whether it’s your NES pad, Sega Genesis controller, or even something from the PlayStation era, fixing sticky buttons on retro controllers is one of the most rewarding maintenance tasks you can do.
Old controllers take a lot of abuse over the years. Dust, grime, soda spills, and general wear can all cause buttons to stick, double-tap, or fail entirely. The good news is that most of these issues are easily fixable at home with a little time, patience, and a basic set of tools. I’ve opened up dozens of classic controllers, and I’m going to show you how to bring yours back to life.
Why Buttons Get Sticky Over Time
Retro controllers are incredibly durable, but no device is immune to time. Most sticky button issues fall into one of three categories: external grime buildup, internal contact pad wear, or plastic warping due to heat or pressure.
Controllers from the 80s and 90s didn’t have the waterproofing or precision sealing of modern hardware. That means dust finds its way in easily, and even slight spills from drinks or food can linger deep inside. Eventually, these residues gum up the rubber membranes beneath the buttons or cause them to sit improperly in their sockets.
Fixing sticky buttons on retro controllers isn’t just about making them responsive again, it’s about preserving them for future play, display, or resale.
Tools and Materials You’ll Need
You don’t need a workshop to restore a retro controller. Most of what you’ll need is either already at home or inexpensive to buy online. For a solid repair session, here’s what I recommend including in your setup:
- Phillips and flathead screwdrivers (precision sizes)
- Tri-wing or Gamebit screwdriver (for Nintendo controllers)
- Isopropyl alcohol (90% or higher)
- Cotton swabs
- Toothpicks or soft plastic picks
- Microfiber cloth
- Soft toothbrush
- Mild dish soap
- Small container or bowl
- Compressed air (optional but helpful)
- White vinyl eraser
- Paper towels or a lint-free drying surface
Optional additions:
- Contact cleaner (DeoxIT or similar)
- Rubber conditioner (for aging membranes)
- Replacement membranes or button kits (for severely worn units)
Gathering these materials is the first step toward fixing sticky buttons on retro controllers and getting them back into reliable shape.
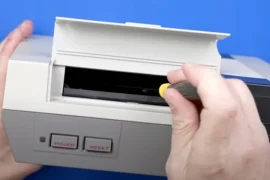
Disassembling the Controller Safely
Start by disconnecting the controller from your console. Lay it on a clean, flat workspace with good lighting. Depending on the controller type, remove the necessary screws from the back casing. For NES or Genesis controllers, a small Phillips driver will do. For SNES or N64, you’ll need a tri-wing screwdriver.
Once all the screws are out, gently pry apart the plastic halves of the controller. Be careful with the wire connection, some models have the cable soldered directly to the board, while others use snap-on connectors. If the controller has shoulder buttons, springs, or any loose components, take note of their placement for reassembly.
Lift off the circuit board and remove the rubber membrane sheets underneath. You’ll now see the plastic buttons and directional pad sitting in their cutouts. Remove these carefully to start the cleaning process.
Cleaning the Buttons and Shell
This is where the real work begins. Old buttons tend to have a thin film of gunk on them, whether from sweaty hands, Cheeto dust, or soda residue. Place all plastic buttons and the D-pad into a small container of warm water with a drop of dish soap. Let them soak while you work on the rest.
Use a toothbrush to scrub inside the controller shell. Focus on the button wells where buildup often accumulates. You can dip the brush in soapy water or a little alcohol for tougher grime. Toothpicks help dislodge debris in tight corners.
Rinse the buttons after soaking and scrub them individually to remove any leftover residue. Then place them on a towel or paper to air dry.
The exterior shell should also get a wipe-down with a microfiber cloth dipped in alcohol. Pay close attention to the grip areas, corners, and seams, places where skin oils and dirt accumulate over years of play.
Cleaning Rubber Membranes and Contact Pads
The rubber membranes beneath each button are what register the press. They contain conductive pads that close a circuit on the board when pressed. If these are dirty, sticky, or worn, your buttons won’t respond properly.
Dip a cotton swab in alcohol and gently clean the rubber surface. Do the same for the circular contact points on the circuit board. Be patient, this area is delicate, and you don’t want to scrape or damage the contacts.
If the rubber feels brittle or loses its bounce, consider applying a tiny amount of rubber conditioner or ordering replacement membranes. For many common retro systems, such replacements are easy to find online.
In some cases, gently rubbing the contact pads on the board with a white vinyl eraser can help remove oxidation and improve response time.
Fixing sticky buttons on retro controllers often comes down to this step, the rubber membrane and contact interface is where most signal loss or mushiness occurs.
Reassembling the Controller
After everything is dry and clean, reassembly is straightforward. Start by placing the buttons back into their respective slots. Then lay the clean rubber membranes over the top, aligning the pegs or guide holes if present.
Reposition the circuit board over the membranes, ensuring it’s aligned with screw holes and cable connectors. Reconnect any wires, springs, or small parts you removed earlier. Finally, snap the shell back together and reinstall all screws evenly.
Before testing, give the controller a few button presses to check that they feel springy and consistent. You’ll usually feel an immediate difference in how crisp and tactile they are.
Testing Functionality
Plug the controller into your console or use a USB adapter for emulation testing. Load up a game that requires frequent button use, Street Fighter II, Mega Man, or Sonic the Hedgehog are great for putting inputs to the test.
Check every direction, button, and combo input. If one still feels sluggish, try pressing it 20–30 times in quick succession. Sometimes reactivation of a long-unused membrane takes a bit of motion.
If a button still fails after cleaning, revisit the contact pad and ensure it’s not worn through. In rare cases, the carbon material wears out entirely, and you may need to apply a conductive paint repair or install a replacement pad.
Preventing Future Stickiness
Once you’ve done the work of fixing sticky buttons on retro controllers, you’ll want to keep them that way. Here are a few habits to help preserve your freshly cleaned hardware:
- Store controllers in a sealed box or drawer to keep dust away
- Avoid playing with greasy or wet hands
- Don’t leave controllers in hot cars or direct sunlight
- Wipe them down with a dry cloth after use
- Clean buttons every few months if you game frequently
These small habits can extend the life of your controller significantly and reduce the need for deep cleaning down the road.
Special Cases: Rare and Third-Party Controllers
Not all controllers are created equal. Third-party accessories, arcade sticks, or rare imports may use different materials and internal layouts. If you’re fixing sticky buttons on retro controllers like the Sega Saturn 3D Pad or original Neo Geo joystick, be extra cautious during disassembly. Some of these have unique tension systems or hard-to-replace internals.
In these cases, I take photos at every step of disassembly to guide me during reassembly. It’s easy to get lost once the springs come flying out.
Third-party controllers also vary wildly in quality. While some clone pads are built surprisingly well, others might be glued shut or use brittle plastics. Cleaning them is still possible, but you may need to improvise or even reinforce parts during reassembly.
Why It Matters
Retro gaming isn’t just about the games, it’s about the experience. Holding the original controller in your hands, feeling the click of the D-pad, and hearing the familiar chime of the startup screen makes it special. Sticky buttons take that magic away. But with a bit of care, you can fix them and revive the authentic feel of your old favorites.
Fixing sticky buttons on retro controllers doesn’t require advanced electronics knowledge. You don’t need soldering irons or test benches, just a little patience and the right cleaning approach. That makes it a perfect starting point for anyone new to console restoration or game preservation.
Conclusion
Sticky buttons may seem like a small annoyance, but they can make a big difference in gameplay. With a basic set of tools and a careful hand, fixing sticky buttons on retro controllers is a straightforward and satisfying task. You’ll extend the life of your gear, improve your gaming sessions, and gain a deeper appreciation for the build quality of classic hardware.
Whether you’re prepping your SNES pad for another run at Super Metroid, restoring a Genesis controller for couch co-op, or just keeping your collection display-ready, regular maintenance is key. So crack open that controller, clean it out, and bring it back to life. Your hands, and your high scores, will thank you.