How To Find Authentic Retro Consoles Without Overpaying Or Getting Scammed
The best way to find authentic retro consoles at fair prices is to slow the process down: set a price baseline from completed sales, vet the seller harder than the hardware, and ask for proof you can verify. Combine clear photos, serial/PCB checks, and a short date-stamped demo video with secure, reversible payment. When in doubt, lean on tested sellers and third‑party verification—even if it costs a little more, it often saves you from dead-on-arrival units or bootlegs. This Retro Gaming Blog guide walks you through price research, authenticity checks, provenance, in-person testing, and payment protections so you can buy confidently and preserve great hardware without getting burned.
Start with a price baseline and model research
Before messaging any seller, anchor yourself to current value. Build a price baseline—a rolling average of recent completed sales for the same console model and condition across multiple marketplaces. Use it to cap bids and flag listings that are suspiciously high or “too good to be true.”
Check sold listings on auction sites, forum marketplaces, and reputable specialist storefronts. Expect premiums for boxed, serviced, or verified units. Verified storefronts that test and authenticate hardware reduce risk and typically charge a modest premium, often with warranties and return windows, as highlighted by tested and authenticated sellers on Retro Broker. Retro Gaming Blog buying guides show what these premiums buy you so you can decide when they’re worth it.
Create a quick matrix for each target model so you can compare apples to apples across regions and revisions.
| Model variant | Common issues | Typical price (loose, tested) | CIB premium | Regional notes |
|---|---|---|---|---|
| SNES SNS-CPU-1CHIP-02 (NTSC-U) | Yellowing, cart slot wear, aging caps | $130–$200 | +40–60% | 1CHIP prized for crisp video; SFC (NTSC-J) often cheaper |
| Sega Saturn Model 2 (USA) | Laser wear, dead CR2032, door switches | $140–$220 | +35–55% | PAL library differs; mod-chips/ODEs impact value |
| PlayStation SCPH-1001 | Weak lasers, spindle cracks, AV jack wear | $90–$150 | +30–50% | RCA outs are desirable; later revisions can be more reliable |
| Nintendo 64 NUS-CPU-05 (NTSC-U) | Loose joystick, cart slot grime | $90–$140 | +50–80% | Early boards are RGB‑modifiable; region lock varies |
| Sega Genesis Model 1 VA3 | Jailbars, PSU noise, power jack wiggle | $80–$130 | +30–50% | Native RGB via 8‑pin DIN; TMSS screen on some units |
Ranges are illustrative; always recalibrate with your current completed‑sale data.
Check completed sales data across multiple marketplaces
- Pull 10–15 recent completed listings per model and condition; exclude obvious parts-only or outliers to avoid skew.
- Tag results by region (NTSC‑U/C, PAL, NTSC‑J) and by revision (e.g., SNS‑CPU‑1CHIP) so you’re not mixing markets.
- Note that verified storefronts can justify modest premiums while lowering the odds of fakes or DOA units.
- Retro Gaming Blog articles call out typical premiums by platform and revision to help you weigh risk versus cost.
Note model revisions, regional variants, and common failure points
Two identical‑looking listings can differ by 30% or more based on revision, region, and reliability. Focus on:
- RGB-capable boards and video quality differences
- Power supply compatibility and safety
- Disc drive or optical pickup reliability
- Cartridge connector wear and cleaning needs
- Capacitor age and known weak points
Revision — a manufacturer hardware update that can change video quality, reliability, and value. Some revisions are preferred for RGB or modding; see our beginner RGB guides in the Modding category for why that affects price.
Identify modern recreations and clones versus original hardware
Clone/recreation console — new or DIY hardware that imitates an original system, often using emulation, FPGA, or PC components instead of original chips. Read listings closely for signals like “3D‑printed,” “custom PCB,” or “open‑source project.” For example, Tom’s Hardware described a prototype Framework-based DIY console using a laptop mainboard, a custom cartridge PCB as a microSD breakout, and a mostly 3D‑printed shell—credible builds, but not original hardware.
Use this quick comparison when scanning listings:
| Type | What’s inside | Tell‑tales in listings | Pros | Cons |
|---|---|---|---|---|
| Original console | OEM chips/boards | OEM labels/serials, era plastics | Authenticity, collectibility | Aging parts, variable reliability |
| Software emulation box | ARM/SoC running emulators | “HDMI mini,” “built‑in games,” “RetroPie” | Cheap, HDMI easy | Input lag, accuracy varies |
| FPGA recreation | FPGA core per system | “FPGA,” “cycle‑accurate,” specific brands | Low latency, high accuracy | Costly, still not OEM |
| DIY/3D‑printed PC build | Laptop/PC board + custom PCB | “3D‑printed,” “Framework,” “custom PCB” | Flexible, moddable | Not collectible as OEM |
Have a tell you rely on to spot clones fast? Share it with the Retro Gaming Blog community.
Vet the seller before the console
Most costly mistakes are seller problems, not hardware mysteries. Prioritize sellers with long transaction histories, recent feedback, clear return windows, and transparent condition notes. Message with 2–3 specific questions (serial prefix, output tested, service history) to gauge knowledge and responsiveness.
Red flags:
- Zero or stale feedback
- Stock photos or “unopened storage find” with no proof
- Refusal to provide new photos/video
- Off‑platform payment requests
Review seller history, return policies, and verification badges
- Check feedback recency and product match (retro hardware vs unrelated goods).
- Specialist marketplaces sometimes test/authenticate and label items; this meaningfully lowers the chance of fakes or DOA units.
- Ask for an arrival‑testing return window (48–72 hours) and whether serials are recorded to prevent returns fraud.
Favor documented listings over vague descriptions
Look for listings that “show their work”: high‑res photos, visible serials, optional PCB shots, and a brief condition report. “Works great” without proof isn’t enough.
Mini‑checklist for buyers:
- Photos: exterior, labels, ports, screws, and optional PCB
- Short video demo with today’s date
- Provenance: receipts/box/manuals if available
- Mod/repair receipts and who performed the work
Watch for pressure tactics and too-good-to-be-true pricing
Urgent countdowns, wire‑only deals, or moving off‑platform are classic manipulation. Compare to your price baseline; extreme underpricing plus urgency is a common scam pattern. Walk away.
Got a seller‑screening tip we missed? Drop it below for the Retro Gaming Blog community.
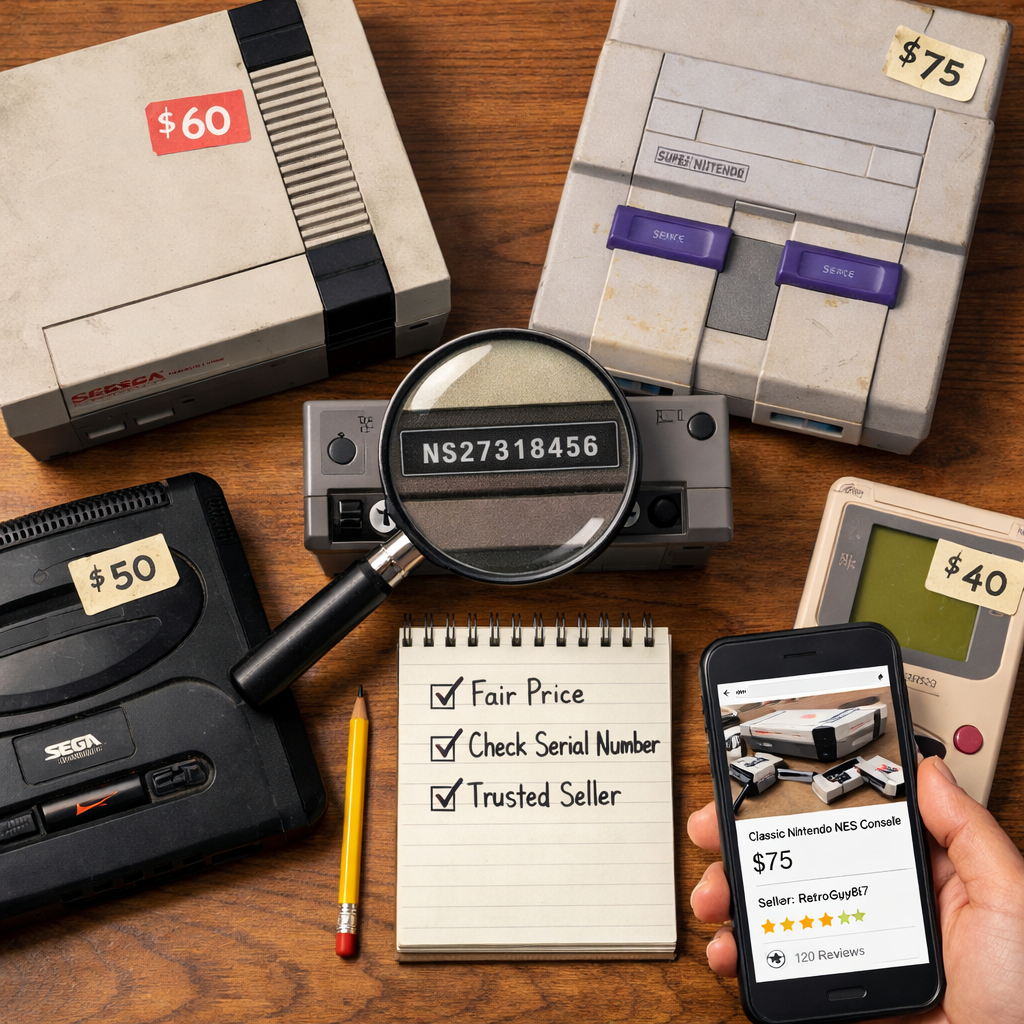
Request proof and verify the hardware
No single check is definitive. Combine serial comparison, visual inspection, functional tests, and provenance. Community threads note that serials can help but aren’t foolproof; board swaps and mismatched covers happen, so corroborate with other evidence per community advice on verifying NES authenticity. For PCB marking and layout references, reverse‑engineering hubs like RetroReversing’s PCB reference library are invaluable.
Ask for clear photos of labels, serials, screws, and ports
Request close‑ups of rear/bottom labels, serial number, port layouts, screw types, and any RF shielding. Natural light, multiple angles, and macro focus save everyone time.
High-resolution photo set — a collection of clear, close, well‑lit images revealing label fonts, injection marks, screw heads, board codes, and wear patterns that are hard to fake.
Compare serial formats and PCB markings to known references
- Serial format consistency (font, prefix) matters; mismatches can flag parts swaps but aren’t conclusive alone.
- When possible, compare PCB silkscreen codes and component placement to documented examples for your platform using RetroReversing’s PCB reference library.
Request a short date-stamped video demo of core functions
Ask for a 30–60 second clip showing power‑on, controller detection, cartridge/disc read, audio/video output, and basic port checks, with today’s date visible. Live demonstration is a standard part of console verification in TASVideos’ console verification guide.
Have a favorite test game that always reveals problems fast? Tell the Retro Gaming Blog community which and why.
Validate provenance to reduce risk
Provenance — the documented history of an item’s ownership, service, and modifications. Strong provenance supports higher confidence, fair premiums, and easier resale or insurance claims.
Collect photos of manuals, receipts, and packaging. Cross‑check details against prior listings, serial ranges, or community logs to confirm consistency.
Ask for receipts, manuals, and original packaging details
- Match serials on box/manuals to the console; verify retailer receipts and period‑accurate packaging codes.
- Photograph inserts and registration cards; note any region mismatches that could depress value.
Confirm repair or mod history and who performed the work
- Request repair invoices and technician details; clarify if capacitors, lasers, or cartridge slots were replaced.
- If you want better video, confirm revision compatibility and workmanship standards for RGB work; see our beginners’ guide to RGB mods for retro consoles for what to expect.
Cross-check past listings and community logs for consistency
Search for the console’s serial across past marketplace posts and forums. Consider logging ownership history with community tools, such as a collector tracking tool in development showcased on YouTube. Consult platform‑specific red flags and best practices in the GameVerifying community wiki.
Have provenance tips from the ’90s magazine era—like retailer stickers or service stamps? We’d love to hear them in the Retro Gaming Blog comments.
Inspect safely and test like a collector
When local pickup is possible, run a quick, respectful test flow:
- Exterior: cracks, yellowing, missing feet/doors
- Ports: wiggle‑free fit, no corrosion
- Power‑on: stable boot, no cycling
- Inputs: controller buttons/joysticks register
- Media read: cartridge/disc loads reliably
- AV output: clean image, consistent audio
- Short stress: 10 minutes of gameplay without faults
Capture a simple pass/fail list to negotiate price or walk away.
Prefer local pickup with on-the-spot testing
Meet in a safe, public place with power and a display if you can; otherwise test at the seller’s home with them present. Live playback demonstrations are widely used in verification contexts and quickly confirm basic function.
Bring known-good cables, controllers, and a test game
Control variables by packing a known‑good PSU, AV/RGB cable, controller, and a reliable test cartridge/disc. Snap quick photos or video of the session for your records.
Check video output quality, cartridge slot, disc drive, and power stability
Look for clean, stable video (no rolling or sudden color dropouts), consistent audio, snug cartridge seating, smooth disc spin/seek, and no random resets. Note RGB or S‑Video capability and noise performance if you plan display upgrades; our CRT/upscaler resources can help you choose the right path.
Got a field‑testing ritual that saves time? Share your checklist with the Retro Gaming Blog community.
Use trusted verification and payment protections
Professional verifiers and specialist marketplaces can test and authenticate hardware to reduce bootlegs and fraud, though services add cost. Third-party verification — an independent assessment documenting authenticity and functionality — moves you from “probably fine” to “confident.” The rise of independent verifiers reflects how they guide collectors through a world of fakes and bootlegs, as covered in GameSpot’s profile of independent game verifiers.
Consider specialist authenticators and tested sellers
If you’re unsure, lean on community verification guides and wikis for Sony/Nintendo/Sega best practices, like the GameVerifying community wiki. Tested sellers and marketplaces list diagnostics, photos, and return policies—paying a bit more here often buys peace of mind. Retro Gaming Blog guides summarize platform‑specific checks so you can screen faster.
Choose secure payment methods or escrow over wire transfers
Use platform checkout, credit cards, or reputable escrow. Avoid wire transfers or friends‑and‑family payments to unknown sellers. Keep all messages and payments on‑platform for built‑in protection.
Document everything for dispute resolution
Save screenshots of the listing, messages, serial photos, payment confirmations, tracking, and an unboxing video. Organized evidence is your safety net.
Have you used an authenticator or escrow you trust? Tell us how it went on Retro Gaming Blog.
Know when to walk away and what to pay
Set a walk‑away price grounded in your baseline and the unit’s condition, factoring repair risk and shipping. Verified, serviced, or boxed units can justify premiums when documentation is strong.
Set a firm ceiling price based on condition and completeness
Use a simple matrix: condition grade × completeness × provenance strength = ceiling price. Reduce your ceiling for unknown HDMI/RGB mods or suspected shell swaps until they’re verified.
Understand fair premiums for verified, serviced, or boxed units
Authentication/testing and genuine working stock usually merit a modest premium because they reduce the risk of fakes or DOA issues. As a rule of thumb, expect about +10–25% for verified/tested, +20–40% for serviced/recapped, and +30–60% for complete‑in‑box—always align with current baselines.
Avoid bidding wars and manufactured scarcity
Set a snipe limit or use Buy It Now when the price is fair. Ignore “last one” language and countdown tactics; there’s always another listing.
What’s your personal walk‑away rule? Share it so newcomers can learn from it on Retro Gaming Blog.
Retro Gaming Blog guidance and community resources
At Retro Gaming Blog, we balance nostalgia with preservation and practical buying. If you’re chasing the best video, know which revisions to seek and why verified units retain value. We cover RGB, CRTs, and value‑retaining hardware with the same care we put into ’90s magazine culture deep dives.
Our preservation-minded buying guides and RGB mod explainers
Start with our beginners’ guide to RGB mods for retro consoles and browse our Modding category for safe upgrade paths. RGB mod — a hardware modification that enables higher‑fidelity analog video output (separate red/green/blue signals), improving clarity on CRTs and upscalers, and often affecting a console’s desirability and price.
Value-retaining console roundups and legal classic game resources
Plan a collection that holds value with our retro consoles that still hold their value roundup, and pair hardware with the right display using our best CRT TVs for retro consoles guide. We advocate ethical sourcing and preservation‑friendly access to classics through official reissues, archives, and educational resources highlighted in our retro culture coverage.
Join the discussion and share your finds and questions
Post your serial ranges, repair notes, verification wins, and suspicious listings in the comments. Your tips help fellow collectors avoid scams and keep original hardware alive.
Frequently asked questions
Where can I get vintage game consoles without getting scammed?
Start with reputable sellers that test/authenticate hardware, compare prices to completed sales, and request serial/PCB photos plus a short date‑stamped demo video; when unsure, use a specialist verifier and pay with buyer‑protected methods. Retro Gaming Blog’s buying guides walk you through each step.
How can I tell if a retro console is authentic and not a clone?
Request high‑res photos of labels, screws, and PCB markings, compare them to known references, and watch for terms like “3D‑printed” or “custom PCB”; confirm with a brief live demo. Retro Gaming Blog guides outline these checks so you can move quickly.
What are common red flags in listings for older hardware?
Stock photos, vague “untested” claims, refusal to provide new images or video, off‑platform payment requests, and prices far below market are classic warning signs. Retro Gaming Blog spotlights these red flags in our buying guides.
Is paying more for a verified or serviced console worth it?
Often yes—verified/tested units reduce the risk of fakes or DOA issues, and serviced consoles tend to be more reliable, justifying reasonable premiums. We explain when the premium makes sense based on risk reduction.
What should I bring to test a console during local pickup?
Bring a known‑good PSU, AV/RGB cables, a reliable controller, and a test cart/disc; check power stability, video/audio output, media read, and inputs, and document the session. See Retro Gaming Blog’s test‑checklist section above for what to verify.